The Basics of Protocols and Delegates
Posted: July 22, 2011 Filed under: iPhone | Tags: delegate Leave a commentIntroduction
Protocols can be helpful in a number of scenarios, a common usage is to define methods that are to be implemented by other classes. A familiar example is when using a tableview, your class implements the cellForRowAtIndexPath method which asks for cell content to insert into a table – the cellForRowAtIndexPath method is defined within the UITableViewDataSource protocol.
Let’s walk through a very simple example of defining and adopting a protocol.
Protocol Definition
Here is an example of a protocol which includes one method, notice the instance variable delegate is of type id, as it will be unknown at compile time the type of class that will adopt this protocol.
#import <Foundation/Foundation.h>

@protocol ProcessDataDelegate <NSObject>
@required
- (void) processSuccessful: (BOOL)success;
@end

@interface ClassWithProtocol : NSObject
{
 id <ProcessDataDelegate> delegate;
}

@property (retain) id delegate;

-(void)startSomeProcess;

@end
Protocol Implementation
Inside the implementation section for the interface defined above we need to do two things at a minimum – first synthesize the delegate instance variable and second, call the method defined in the protocol as needed (more on that in a moment).
Let’s look at a bare bones implementation of the ClassWithProtocol.m:
#import "ClassWithProtocol.h"

@implementation ClassWithProtocol

@synthesize delegate;

- (void)processComplete
{
  [[self delegate] processSuccessful:YES];
}

-(void)startSomeProcess
{
  [NSTimer scheduledTimerWithTimeInterval:5.0 target:self
    selector:@selector(processComplete) userInfo:nil repeats:YES];
}

@end
Understand this is a rather contrived example – the intention is to show how/where one might use a protocol. For the sake of discussion assume you have a class that is processing (or downloading) some type of data. Further, assume this class is called from another class to begin the processing. Chances are, at some point the caller will want to be notified that the class processing the data is done, this is where the protocol comes in.
In the calling class, the method defined in the protocol, processSuccessful, will be implemented and will be called from the object doing the processing, once it is complete.
For this example, inside the class where the protocol is defined, I have one method, startSomeProcess, which simply starts a timer and calls processComplete after 5 seconds. Inside processComplete the calling object will be notified through its delegate that the process is done.
Adopting the Protocol
To keep the example short, I am using the applicaton delegate as the class that adopts the protocol. Here is how the app delegate looks:
#import <UIKit/UIKit.h>
#import "ClassWithProtocol.h"

@interface TestAppDelegate : NSObject <UIApplicationDelegate, ProcessDataDelegate>
{
  UIWindow *window;
  ClassWithProtocol *protocolTest;
}

@property (nonatomic, retain) UIWindow *window;

@end
A few things to note – ProcessDataDelegate is defined as part of the interface, which signifies that this class will adhere to the protocol. Looking back to the code for defining the protocol, notice that I added @required to the definition, which means that any class that adopts the protocol must implement the processComplete method (you will receive a compile warning if you don’t).
Here is the implementation of the app delegate and the required method for the protocol:
#import "TestAppDelegate.h"
#import "ClassWithProtocol.h"

@implementation TestAppDelegate

@synthesize window;

 UITableViewDelegate

- (void)processSuccessful:(BOOL)success;
{
  NSLog(@"Process completed");
}

- (void)applicationDidFinishLaunching:(UIApplication *)application
{
  // Create and initialize the window
  window = [[UIWindow alloc] initWithFrame:[[UIScreen mainScreen] bounds]];

  protocolTest = [[ClassWithProtocol alloc] init];
  [protocolTest setDelegate:self];
  [protocolTest startSomeProcess];

  [window makeKeyAndVisible];
}

- (void)dealloc
{
  [window release];
  [super dealloc];
}

@end
How it all works
Things goes as follows: the app delegate will create a new instance of the ClassWithProtocol object. It sets itself as the delegate and then calls the startSomeProcess method. At some point in the future, when the protocolTest object has completed its work – after the 5 second timer has fired – it will call the processSuccessful method in the app delegate to let it know it is done processing.
(Source:http://iphonedevelopertips.com/objective-c/the-basics-of-protocols-and-delegates.html)
How to Add iAd Banner in iPhone App
Posted: June 10, 2011 Filed under: iPhone | Tags: iAd Leave a commentIn April 2010 during iOS 4 presentation Steve Jobs announced new advertisement platform – iAd. This platform is intended to allow developers of free apps to earn on their apps showing advertisement. The main idea of iAd is to connect interactivity (using smartphone or tablet) and emotionality of advertisement (JavaScript, HTML5, CSS3, multi-touch). It allows to create absolutely awesome advertisement which looks like apps with video and audio. In addition, iAd ads is opened inside the app and user do not exit his app and can get back anytime he wants.
Below is the guide on how to add iAd banner into iPhone app. Guide is based on iAd Programming Guide and WWDC 2010 video.
Add iAd Banner to iPhone App
The first thing you need to do is to add iAd.framework in your Xcode project which is contained in iOS 4 SDK. Also do not forget to add #import <iAd/iAD.h>. Developers can choose between two banners: 320×50 px for portrait and 480×32 px for landscape. The base of banner is ADBannerView, which is subclass of UIView. So the only thing you have to do is to add this view in your control elements hierarchy (you can do this programmatically or using Interface Builder).

Apple recommends to put banner at the bottom or at the top of the window and do not place it on any moving elements like ScrollView or TableView as far as that will decrease shows of banner (and your revenue respectively) and will make it more difficult for user to tap on the ads.
Let’s create a new project in Xcode using View-based Application template and add a banner into it. Name of the app – iAdEx. We are going to edit iAdExViewController.h
#import <UIKit/UIKit.h>
#import <iAd/iAd.h>
@interface iAdExViewController : UIViewController <ADBannerViewDelegate> {
ADBannerView *adView;
BOOL bannerIsVisible;
}
@property (nonatomic, assign) BOOL bannerIsVisible;
@end
and modify viewDidLoad method in iAdExViewController.m
adView = [[ADBannerView alloc] initWithFrame:CGRectZero];
adView.frame = CGRectOffset(adView.frame, 0, -50);
adView.requiredContentSizeIdentifiers = [NSSet setWithObject:ADBannerContentSizeIdentifierPortrait];
adView.currentContentSizeIdentifier = ADBannerContentSizeIdentifierPortrait;
[self.view addSubview:adView];
adView.delegate=self;
self.bannerIsVisible=NO;
[super viewDidLoad];
Let’s talk about requiredContentSizeIdentifiers and currentContentSizeIdentifier properties. In the first one you define all types of banners you are going to use. And the second property defines which type of banner you are going to use at the present moment.
Connection issues
Banners are downloaded from the network. What if we have no network connection right now? Or Apple has any issues with ads server? Our ADBannerView will be empty is these cases. It doesn’t look very nice and wastes space on the screen. Apple recommends to do it in this way: when there is no banner for any reason remove it from the screen; when banner is received – show it again.
We have the ADBannerViewDelegate in our class and it can receive messages from banner – bannerViewDidLoadAd (when banner is loaded successfully) and didFailToReceiveAdWithError (when any problems occured). Let’s implement these messages:
//when banner is loaded successfully
- (void)bannerViewDidLoadAd:(ADBannerView *)banner
{
if (!self.bannerIsVisible)
{
[UIView beginAnimations:@"animateAdBannerOn" context:NULL];
// banner is invisible now and moved out of the screen on 50 px
banner.frame = CGRectOffset(banner.frame, 0, 50);
[UIView commitAnimations];
self.bannerIsVisible = YES;
}
}

//when any problems occured
- (void)bannerView:(ADBannerView *)banner didFailToReceiveAdWithError:(NSError *)error
{
if (self.bannerIsVisible)
{
[UIView beginAnimations:@"animateAdBannerOff" context:NULL];
// banner is visible and we move it out of the screen, due to connection issue
banner.frame = CGRectOffset(banner.frame, 0, -50);
[UIView commitAnimations];
self.bannerIsVisible = NO;
}
}
It’s time to launch the app and see what we have now:

Tap the banner

And that’s it – we’ve done it in accordance with Apple’s recommendations. When we launch the app we see the banner. If we tap it, then full view of advertisement is shown. But we still have one issue…
Stop & Resume your app
In real app we should stop any application’s activity such as video, audio playback or pause game. In order to solve this task we will create two methods
//when full screen ad is shown
- (BOOL)bannerViewActionShouldBegin:(ADBannerView *)banner willLeaveApplication:(BOOL)willLeave
{
	NSLog(@"Banner view is beginning an ad action");
	BOOL shouldExecuteAction = YES;
	if (!willLeave && shouldExecuteAction)
    {
		// stop all interactive processes in the app

    }
	return shouldExecuteAction;
}

//when we close ads
- (void)bannerViewActionDidFinish:(ADBannerView *)banner
{
	// resume everything you've stopped

}
Change Orientation of iAd
What else should we do? We need to make banner change it’s orientation in accordance with iPhone position. First of all we need to change the line where we define types of banners which we will use:
adView.requiredContentSizeIdentifiers = [NSSet setWithObjects:ADBannerContentSizeIdentifierPortrait, ADBannerContentSizeIdentifierLandscape,nil];
and here are methods for changing orientation:
// Override to allow orientations other than the default portrait orientation.
- (BOOL)shouldAutorotateToInterfaceOrientation:(UIInterfaceOrientation)interfaceOrientation {
// Return YES for supported orientations
return (interfaceOrientation == UIInterfaceOrientationPortrait|UIInterfaceOrientationPortrait);
}

- (void)willRotateToInterfaceOrientation:(UIInterfaceOrientation)toInterfaceOrientation duration:(NSTimeInterval)duration
{
if (UIInterfaceOrientationIsLandscape(toInterfaceOrientation))
adView.currentContentSizeIdentifier = ADBannerContentSizeIdentifierLandscape;
else
adView.currentContentSizeIdentifier = ADBannerContentSizeIdentifierPortrait;
}
And here is how it look in a landscape

When device changes orientation we change currentContentSizeIdentifier property of ADBannerView. Now we can see banners in landscape mode too. There is still 50 px offset, but it’s easy to fix.
Apple developers also recommend to write object.delegate=nil; line before deallocating ADBannerView object. In our example it will look like:
- (void)dealloc {
adView.delegate=nil;
[adView release];
[super dealloc];
}
Now we have finished with programming part. Good luck with Apple iAd!
(Source:http://bees4honey.com/blog/tutorial/how-to-add-iad-banner-in-iphoneipad-app/)
Deploying iPhone Apps to Real Devices
Posted: June 9, 2011 Filed under: iPhone | Tags: deploy, real device Leave a commentSign up for the iPhone Developer Program
The first step towards testing your applications on a real device is to sign up for the iPhone Developer Program at http://developer.apple.com/iphone/program/. There are two programs available – Standard and Enterprise. For most developers wanting to release applications on the App Store, they can simply sign up for the Standard program, which costs US$99. Check out http://developer.apple.com/iphone/program/apply.html to know more about the differences between the Standard and Enterprise programs.
Start your Xcode
In order to test your iPhone applications on your device, you need to obtain an iPhone Development Certificate from the iPhone Developer Program Portal. This needs to be done once for every device you wish to test your apps on. The following sections walk you through the various steps, from obtaining your certificate, to deploying your applications onto the device.
First, obtain the 40-character identifier that uniquely identitfies your iPhone/iPod Touch. To do so, connect your device to your Mac and start Xcode. Select the Window > Organizer menu item to launch the Organizer application. Figure 1 shows the Organizer application showing the identifier of my iPhone. Copy this identifier and save it somewhere. You will need it later on.

Figure 1 Obtaining the identifier for your iPhone/iPod Touch
Generating a Certificate Signing Request
Before you can request a development certificate from Apple, you need to generate a Certificate Signing Request. This step must be performed once for every device you wish to test on. To generate the request, you can use the Keychain Access application located in the Applications/Utilities/ folder (see Figure 2).

Figure 2 Launching the Keychain Access application
In the Keychain Access application, select the Keychain Access > Certificate Assistant menu and select Request a Certificate From a Certificate Authority (see Figure 3).

Figure 3 Requesting a certificate
In the Certificate Assistant window (see Figure 4), enter your email address, check the Saved to disk radio button and check the Let me specify key pair information checkbox. Click Continue.

Figure 4 Providing certificate information
Choose a key size of 2048 bits and use the RSA algorithm (see Figure 5). Click Continue.

Figure 5 Specifying key pair information
You will be asked to save the request to a file. Use the default name suggested and click Save (see Figure 6).

Figure 6 Saving the certificate request to a file
Logging in to the iPhone Developer Program Portal
Once you have generated the certificate signing request, you need to login to Apple’s iPhone Dev Center (see Figure 7). Click on the iPhone Developer Program Portal link on the right of the page. Remember, you need to pay US$99 in order to access this page.

Figure 7 Logging in to the iPhone Dev Center
In the iPhone Developer Program Portal page, click the Launch Assistant button (see Figure 8) to walk you through the process of provisioning your iPhone and generating the development certificate.

Figure 8 Launching the provisioning assistant
You should see the welcome page as shown in Figure 9. Click Continue.

Figure 9 The welcome page of the provisioning assistant
First, you will be asked to create an App ID (see Figure 10). An App ID is a series of characters used to uniquely identify an application (or applications) on your iPhone. You only need to create an App ID once per application, i.e. you do not need a new App ID for new versions of your app. Enter a friendly name to describe this App ID (to be generated by Apple). Click Continue.

Figure 10 Creating an App ID
The next screen allows you to provide a description of your iPhone/iPod Touch. You need to provide the device ID that you have obtained earlier (see Figure 11). Click Continue.

Figure 11 Assigning a device for the provisioning
You are now ready to submit the certificate signing request to Apple (see Figure 12). The instructions on the screen show you the steps that you have performed earlier. Click Continue.

Figure 12 Generating a certificate signing request
In this screen, click the Choose File button (see Figure 13) to select the certificate signing request file that you have created earlier. Once the file has been selected, click Continue.

Figure 13 Submitting a certificate signing request
Provide a description for your provisioning profile (see Figure 14). A Provisioning profile will be generated so that you can download it at a later stage and install it on your device. Click Generate.

Figure 14 Naming your provisioning profile
A Provisioning profile will now be generated (see Figure 15). Once it is generated, click Continue.

Figure 15 Generating a provisioning profile
You are now ready to download the generated Provisioning profile onto your Mac (see Figure 16). Click Continue.

Figure 16 Downloading and installing your provisioning profile
Drag and drop the downloaded Provisioning profile (in the Downloads folder) onto Xcode (located in the Dock). This will install the Provisioning profile onto your connected iPhone/iPod Touch. Click Continue (see Figure 17).

Figure 17 Instructions to verify the installation
You can verify that the Provisioning profile is installed correctly on your device by going to the Organizer application and viewing the Provisioning section (see Figure 18) to see if the profile has been added.

Figure 18 Verifying the provisioning profile on the Organizer
Back in the iPhone Developer Program Portal, you are now ready to download and install the development certificate onto your iPhone/iPod Touch. Click the Download Now button (see Figure 19) to download the development certificate to your Mac. Click Continue.

Figure 19 Downloading and installing the development certificate
In the Downloads folder of your Mac, double-click on the developer_identify.cer file that you have just downloaded to install it into a keychain on your Mac. When prompted (see Figure 20), click OK.

Figure 20 Adding a certificate to the keychain
Back in the iPhone Developer Program Portal, you can now verify that the certificate has been installed properly in the Keychain Access application (see Figure 21). Click Continue.

Figure 21 Instructions for verifying the installation of the certificate
In the Keychain Access application, select the login keychain and look for the certificate named “iPhone Developer:” (see Figure 22). If you can see it there, your certificate is installed correctly.

Figure 22 Verifying the installation of the certificate
You are now almost ready to deploy your iPhone application onto your iPhone/iPod Touch. Click Continue (see Figure 23).

Figure 23 Instructions for installing your applications with Xcode
Click Done to dismiss the dialog (see Figure 24).

Figure 24 Finishing the installation
In Xcode, under the Active SDK item (if this item is not already on the toolbar, go to View > Customize Toolbar and add it to the toolbar), select the OS version number of the device that is currently connected to your Mac. In my case, my iPhone is running the older iPhone OS 2.0, hence I selected “iPhone Device (2.0)” (see Figure 25).

Figure 25 Selecting the active SDK
With your application project open in Xcode, press Command-R to run the application. You will now be prompted for permission to access the certificate saved in your keychain. Click Allow (or Always Allow) to go ahead with the signing (see Figure 26).

Figure 26 Signing your application with the certificate
Your application will now be deployed to the device. You can see its progress in the Summary tab of the Organizer application (see Figure 27).

Figure 27 Checking the Organizer for installation progress
Once the application is deployed onto your device, it will be running automatically. You can capture screenshots of your device by going to the Screenshot tab of the Organizer application, and pressing the capture button (see Figure 28).

Figure 28 Capturing screenshots using Organizer
Summary
In this article, you have seen the various steps required to deploy your application to your iPhone or iPod Touch. While the number of steps looked intimidating, it is actually quite straightforward. The iPhone Developer program allows you to provision up to 100 devices for testing purposes. Once a device is provisioned, you can then use the development certificate to deploy your applications onto it.
(Source: http://mobiforge.com/developing/story/deploying-iphone-apps-real-devices)
UITabBarController with UINavigationController Using Interface Builder
Posted: June 8, 2011 Filed under: iPhone | Tags: UINavigationController, UITabBarController 1 CommentI’ve seen a good bit of sample code that shows how to implement using a UINavigationController in a view controller that is managed by a UITabBarController, but I haven’t seen much on how to do it with Interface Builder. Turns out that it’s pretty simple and I’m going to show you how.
TabBarNavigator Demo Project
To get started, create a new project in Xcode. Select the Tab Bar Application template and click Choose….

Name the project, TabBarNavigator and click Save
 TabBarNavigator Project
Change The Controller Type
- In Xcode, expand the Resources group in the Groups and Files view and double-click MainWindow.xib to open the xib in Interface Builder
- When Interface builder opens, change the xib View Mode to the tree view mode and expand your Tab Bar Controller item.

- Make sure that the Tab View Controller object is selected. In the object inspector switch to the Attributes tab and change the Class for the First controller from View Controller to Navigation Controller.

- You will notice back in the MainWindow.xib window that the view controller for First View is now a UINavigationController. Expand the UINavigationController item now.

- Now select the View Controller that is a child of our new UINavigationController. Click on the Identity tab of the object inspector and change the Class to FirstViewController.

- Click on the Navigation Item that is a child of the First View Controller and change the Title in the Attributes tab of the object inspector to “First”.

- Save your changes in Interface Builder, switch back to Xcode and Build & Go. You should see something like the following in your First view tab.

- Notice that there is a Toolbar visible at the bottom of the first view. If you would like to hide this, go back into Interface Builder and select the Navigation Controller In the object inspector, uncheck the Shows Toolbar checkbox.


Pushing a New Controller
Before we create a new view controller, let’s set up our FirstViewController to create an event that will trigger pushing the new controller. Since our FirstView was not created with a xib, let’s create one and then add actions and outlets to it.
- In Xcode, right-click or ctrl-click the Resources group and select Add | New File…. In the ensuing dialog, select View XIB in the User Interface section of iPhone OS templates and click Next. Name the XIB FirstView and click Finish.
- Double-click the new XIB to open it in Interface Builder and select the Identity tab after you have made sure that File’s Owner is selected. Change the Class field to FirstViewController.
- Ctrl-click and drag a connection from the File’s Owner object to the View object in the main window for our XIB and select view in the ensuing pop up menu.
- From the Object Library drag and drop a button onto the view. Double-click the button and give it the title “Push”. Save your changes in Interface Builder and switch back to Xcode.

- Open the file FirstViewController.h and add an action so that the header looks like this:
#import <UIKit/UIKit.h> @interface FirstViewController : UIViewController { } - (IBAction)push:(id)sender; @end - Open the file FirstViewController.m and implement the action so that the code looks like this:
#import "FirstViewController.h"

@implementation FirstViewController

- (IBAction)push:(id)sender
{

}

- (void)dealloc {
    [super dealloc];
}

@end
Note: You can safely delete all of the view controller template code which I have done in this example. Don’t worry. You won’t hurt anything.
We will come back to the push implementation after we have created our new view controller that we are going to push.
Create the New View Controller
We are now going to create the new view controller that will be displayed when we tap our “Push” button in the FirstViewController.
- In Xcode, right-click or ctrl-click the Classes group and select Add | New File…. In the ensuing dialog, select UIViewController subclass in the Cocoa Touch Class category of the iPhone OS templates. Make sure With XIB for user interface is checked and click Next. Name the file NewViewController.m and click Finish.
- For organization purposes, move the newly created NewViewController.xib file into the Resources group. Then double-click it to open it in Interface Builder.
- In Interface Builder, drag a UILabel onto the view and give it the title “New View Controller”. Save the file and switch back to Xcode.
- Open the file FirstViewController.m again and implement controller push code so that it looks like this:
#import "FirstViewController.h"
#import "NewViewController.h"

@implementation FirstViewController

- (IBAction)push:(id)sender
{
  NewViewController *controller = [[NewViewController alloc] initWithNibName:@"NewViewController" bundle:nil];
  [[self navigationController] pushViewController:controller animated:YES];
  [controller release], controller = nil;
}

- (void)dealloc {
    [super dealloc];
}

@end
Don’t forget to #import “NewViewController.h”
- To connect our button to the push action, double-click the FirstView.xib file in the Resources group to open it in Interface Builder.
- Ctrl-click and drag a connection from the “Push” button in our view to the File’s Owner object and select push: in the ensuing pop up menu. Save your changes in Interface Builder. Switch back to Xcode and Build & Go.
- Additionally, you can give your New View Controller a title by implementing -viewDidLoad. Just open your NewViewController.m file and uncomment the -viewDidLoad code making it look like the following:
#import "NewViewController.h"

@implementation NewViewController

- (void)viewDidLoad {
  [self setTitle:@"New View"];
  [super viewDidLoad];
}

- (void)dealloc {
  [super dealloc];
}

@end
And that’s pretty much all there is to it. There are a lot of steps here, but I think you’ll see that setting up your application to implement both a UITabBarController and a UINavigationController is pretty straight forward.


Date Formatter: Setting Locale
Posted: June 8, 2011 Filed under: iPhone | Tags: Date Format Leave a commentA reader recently wrote and asked how to show a date output in a different language. By default, the NSDateFormatter will use the locale set on the device, so no code specific locale changes are required if you want your app to display in the current locale.
However, if you need to display a date in a locale other than the current setting on the device, here’s how to do it:
// Create date object
NSDate *date = [NSDate date];

// Create date formatter
NSDateFormatter *dateFormat = [[NSDateFormatter alloc] init];
[dateFormat setDateFormat:@"EEEE MMMM d, YYYY"];

// Set the locale as needed in the formatter (this example uses Japanese)
[dateFormat setLocale:[[[NSLocale alloc] initWithLocaleIdentifier:@"ja_JP"]
    autorelease]];

// Create date string from formatter, using the current date
NSString *dateString = [dateFormat stringFromDate:date];

// We're done with this now
[dateFormat release];

// Show that the locale on the device is still set to US
NSLocale *locale = [NSLocale currentLocale];
NSLog(@"Current Locale: %@", [locale localeIdentifier]);

// Display the date string in format we set above
NSLog(@"Date: %@:", dateString);
The output from the code above looks as follows:

(Source: http://iphonedevelopertips.com/cocoa/date-formatter-examples-take-4-setting-locale.html)
UITableView – Adding subviews to a cell’s content view
Posted: June 6, 2011 Filed under: iPhone | Tags: UITableView Leave a commentUsing the default UITableViewCell we can display a text or an image but sometimes it is not good enough. In this tutorial you will learn how to customize the UITableViewCell.
Introduction
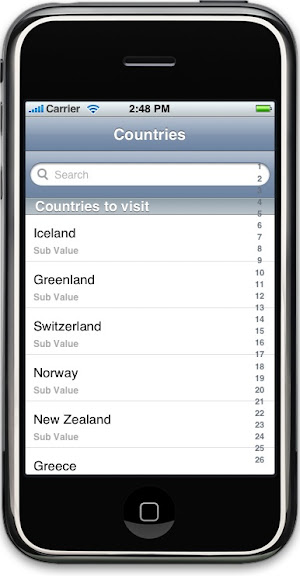
Using the default UITableViewCell, we can display a text (using the text property) or an image (using the image property). However, we cannot display data in multiple columns or rows. This is how the final app will look like
We cannot achieve the display we want by setting the text property of the UITableViewCell. To solve this problem, we are going to add two labels to the content view of the cell. The labels are added in such a way that they show up one above the other by using coordinates. Apple documentation says we should add subviews to the cell’s content view, if you do not want to change the default behavior of the cell. This is the reason why we are not going to inherit from UITableViewCell.
Adding Sub Views
//RootViewController.h
#import &lt;UIKit/UIKit.h&gt;
@class OverlayViewController;
@interface RootViewController : UITableViewController {
NSMutableArray *listOfItems;
NSMutableArray *copyListOfItems;
IBOutlet UISearchBar *searchBar;
BOOL searching;
BOOL letUserSelectRow;
OverlayViewController *ovController;
}
- (UITableViewCell *) getCellContentView:(NSString *)cellIdentifier;
- (void) searchTableView;
- (void) doneSearching_Clicked:(id)sender;
@end
//RootViewController.m
- (UITableViewCell *) getCellContentView:(NSString *)cellIdentifier {
CGRect CellFrame = CGRectMake(0, 0, 300, 60);
CGRect Label1Frame = CGRectMake(10, 10, 290, 25);
CGRect Label2Frame = CGRectMake(10, 33, 290, 25);
UILabel *lblTemp;
UITableViewCell *cell = [[[UITableViewCell alloc] initWithFrame:CellFrame reuseIdentifier:cellIdentifier] autorelease];
//Initialize Label with tag 1.
lblTemp = [[UILabel alloc] initWithFrame:Label1Frame];
lblTemp.tag = 1;
[cell.contentView addSubview:lblTemp];
[lblTemp release];
//Initialize Label with tag 2.
lblTemp = [[UILabel alloc] initWithFrame:Label2Frame];
lblTemp.tag = 2;
lblTemp.font = [UIFont boldSystemFontOfSize:12];
lblTemp.textColor = [UIColor lightGrayColor];
[cell.contentView addSubview:lblTemp];
[lblTemp release];
return cell;
}
The above method creates three rectangles: one for the cell and for the two labels in the cell. We create the cell using initWithFrame:reuseIdentifier, but this time we add two labels to the content view property. Initialize the first label with “Label1Frame” coordinates, which will make this label show up at the top of the cell. Set the tag of this label to 1, so we can find it in tableView:cellForRowAtIndexPath method. Initialize the second label using “Label2″Frame” coordinates, which will make this label to show up at the bottom. The tag of this label is set to 2. The labels are added to the content view using addSubView method. Finally the cell is returned to be reused.
Displaying data
Once we have the table view cell, we can get the underlying label by passing viewWithTag message to the cell. Here the data is set to the text property of the label and not the cell. This is how the code for tableView:cellForRowAtIndexPath changes
//RootViewController.m
- (UITableViewCell *)tableView:(UITableView *)tableView cellForRowAtIndexPath:(NSIndexPath *)indexPath {

static NSString *CellIdentifier = @"Cell";

UITableViewCell *cell = [tableView dequeueReusableCellWithIdentifier:CellIdentifier];

if(cell == nil)
cell = [self getCellContentView:CellIdentifier];

UILabel *lblTemp1 = (UILabel *)[cell viewWithTag:1];
UILabel *lblTemp2 = (UILabel *)[cell viewWithTag:2];

if(searching) {

lblTemp1.text = [copyListOfItems objectAtIndex:indexPath.row];
lblTemp2.text = @"";
}
else {

//First get the dictionary object
NSDictionary *dictionary = [listOfItems objectAtIndex:indexPath.section];
NSArray *array = [dictionary objectForKey:@"Countries"];
NSString *cellValue = [array objectAtIndex:indexPath.row];

lblTemp1.text = cellValue;
lblTemp2.text = @"Sub Value";

[cellValue release];
}

return cell;
}
If you run this application now you will notice some obvious display issues, which we can resolve by specifying the height of the row. This is done in tableView:heightForRowAtIndexPath method. The code looks like this
//RootViewController.m
-(CGFloat)tableView:(UITableView *)tableView heightForRowAtIndexPath:(NSIndexPath *)indexPath {

return 60;
}
All the rows in the table view will have a height of 60. Run your app to see the changes.
(Source: http://www.iphonesdkarticles.com/2009/02/uitableview-adding-subviews-to-cells.html)
Reading data from a SQLite Database
Posted: May 26, 2011 Filed under: iPhone | Tags: sqlite 1 Comment1. Project Requirements
I suggest that you have at least a basic understanding of SQLite, writing SQL statements, the XCode interface and using the terminal in OSX. If you don’t know anything about any of these topics then this tutorial probably isn’t for you.
2. Creating our SQLite database for our tutorial
We first need to create a database for use with our application. For the purposes of this tutorial we will be building a database of animals along with a little information on them and a picture.
Fire up a new Terminal window and make a new folder to store the database in, here are the commands I ran
cd /Users/lookaflyingdonkey/Documents
mkdir SQLiteTutorial
cd SQLiteTutorial
sqlite3 AnimalDatabase.sql
You should now be at a “sqlite” command prompt, this is where we will be building our database structure and entering some test data.
For our example we need the name of the animal, a short description and a link to an image. Follow the commands below to create the table and to enter some sample data.
CREATE TABLE animals ( id INTEGER PRIMARY KEY, name VARCHAR(50), description TEXT, image VARCHAR(255) );

INSERT INTO animals (name, description, image) VALUES ('Elephant', 'The elephant is a very large animal that lives in Africa and Asia', 'http://dblog.com.au/wp-content/elephant.jpg');
INSERT INTO animals (name, description, image) VALUES ('Monkey', 'Monkies can be VERY naughty and often steal clothing from unsuspecting tourists', 'http://dblog.com.au/wp-content/monkey.jpg');
INSERT INTO animals (name, description, image) VALUES ('Galah', 'Galahs are a wonderful bird and they make a great pet (I should know, I have one)', 'http://dblog.com.au/wp-content/galah.jpg');
INSERT INTO animals (name, description, image) VALUES ('Kangaroo', 'Well I had to add the Kangaroo as they are the essence of the Australian image', 'http://dblog.com.au/wp-content/kangaroo.jpg');
The first command will create the table with the required structure and the next four will insert some test data for us to work with. To ensure that you have entered the data correctly you can execute “SELECT * FROM animals;” and see if it returns the items above. Once you are confident that everything had been created successfully you can leave the sqlite command line by typing “.quit”.
3. Creating our Project
Now that our database is all ready to go we need to setup our X-Code project.
Start off by creating a new “Navigation-Based Application”.

Give your Project a name, I called mine “SQLiteTutorial”.
Now set your screen layout to how you prefer it, I suggest making the window as large as possible, and making the code view as tall as possible by dragging the horizontal slider to the top. This will allow you the most room to move when building your application.
Now its time to create the required classes and views for our application, we will start off by making our views.
Right Click on the “Resources” folder in the left hand pane and click “Add File”, we want to create a new “View XIB” under the “User Interfaces” group.

We now need to give it a name, to stick the Apple’s naming conventions we are going to call it “AnimalViewController.xib”, Now Click “Finish”.
Now we need to create two classes, the first one will represent an animal, right click on the “Classes” folder in the left hand pane, click “Add > New File…”, choose the “NSObject subclass” template under the “Cocoa Touch Classes” group and name it “Animal”.
The second class will be for our AnimalsViewController, right click on the “Classes” folder in the left hand pane, click “Add > New File…”, choose the “UIViewController subclass” under the “Cocoa Touch Classes” group and name it “AnimalViewController”.
4. Adding SQLite Framework and our Animal Database
Now that we have created all of our views and classes it is time to start the real grunt work.
First off we need to include the SQLite libraries so our application can utilise them. To do this you will need to right click on the “Frameworks” folder in the left hand pane, then click on “Add > Existing Frameworks…”, then navigate to “/Developer/Platforms/iPhoneOS.platform/Developer/SDKs/iPhoneOS2.0.sdk/usr/lib/” and double click the “libsqlite3.0.dylib” file. A popup will appear, just click “Add” and the library will be added to your project.
We also need to add our database we created earlier to the Resources folder, to do this simply right click on the “Resources” folder, click “Add > Existing Files…”, navigate to the location you created the database in then double click on the AnimalDatabase.sql file. Another popup will appear, just click add.
All done with the importing, time to code!
5. The Coding begins!
We are going to start the coding by building our “Animal” object, every animal will have 3 properties, a name, a description and an image URL.
Open up the “Animal.h” file from the “Classes” folder and edit its contents to look like below,
#import <UIKit/UIKit.h>

@interface Animal : NSObject {
	NSString *name;
	NSString *description;
	NSString *imageURL;
}

@property (nonatomic, retain) NSString *name;
@property (nonatomic, retain) NSString *description;
@property (nonatomic, retain) NSString *imageURL;

-(id)initWithName:(NSString *)n description:(NSString *)d url:(NSString *)u;

@end
Most of the above code should be pretty familiar to you, the only thing that may not be is the initWithName line, this line will allow us to create a new object with the required data, we could have used the default init function, but it will be easier for us to define our own.
Now we will actually have to implement the Animal Object, open up the “Animal.m” file and edit its contents to look like below:
#import "Animal.h"

@implementation Animal
@synthesize name, description, imageURL;

-(id)initWithName:(NSString *)n description:(NSString *)d url:(NSString *)u {
	self.name = n;
	self.description = d;
	self.imageURL = u;
	return self;
}
@end
The above code should be pretty easy to read as well, it basically stores the supplied data from the initWithName function and return the object (self).
Now its time to setup the Application delegate to access the database.
Open up the “SQLiteTutorialAppDelegate.h” and edit its contents to look like below:
#import <UIKit/UIKit.h>
#import <sqlite3.h> // Import the SQLite database framework

@interface SQLiteTutorialAppDelegate : NSObject  {

    UIWindow *window;
    UINavigationController *navigationController;

	// Database variables
	NSString *databaseName;
	NSString *databasePath;

	// Array to store the animal objects
	NSMutableArray *animals;
}

@property (nonatomic, retain) IBOutlet UIWindow *window;
@property (nonatomic, retain) IBOutlet UINavigationController *navigationController;
@property (nonatomic, retain) NSMutableArray *animals;

@end
What we are doing here is importing the SQLite database framework and creating some variables for storing the database details and an array of animal objects.
Now open up the “SQLiteTutorialAppDelegate.m” file and edit its contents to look like below:
#import "SQLiteTutorialAppDelegate.h"
#import "RootViewController.h"
#import "Animal.h" // Import the animal object header

@implementation SQLiteTutorialAppDelegate

@synthesize window;
@synthesize navigationController;
@synthesize animals; // Synthesize the aminals array

- (void)applicationDidFinishLaunching:(UIApplication *)application {
	// Setup some globals
	databaseName = @"AnimalDatabase.sql";

	// Get the path to the documents directory and append the databaseName
	NSArray *documentPaths = NSSearchPathForDirectoriesInDomains(NSDocumentDirectory, NSUserDomainMask, YES);
	NSString *documentsDir = [documentPaths objectAtIndex:0];
	databasePath = [documentsDir stringByAppendingPathComponent:databaseName];

	// Execute the "checkAndCreateDatabase" function
	[self checkAndCreateDatabase];

	// Query the database for all animal records and construct the "animals" array
	[self readAnimalsFromDatabase];

	// Configure and show the window
	[window addSubview:[navigationController view]];
	[window makeKeyAndVisible];
}

- (void)applicationWillTerminate:(UIApplication *)application {
	// Save data if appropriate
}

- (void)dealloc {
	[animals release];
	[navigationController release];
	[window release];
	[super dealloc];
}

-(void) checkAndCreateDatabase{
	// Check if the SQL database has already been saved to the users phone, if not then copy it over
	BOOL success;

	// Create a FileManager object, we will use this to check the status
	// of the database and to copy it over if required
	NSFileManager *fileManager = [NSFileManager defaultManager];

	// Check if the database has already been created in the users filesystem
	success = [fileManager fileExistsAtPath:databasePath];

	// If the database already exists then return without doing anything
	if(success) return;

	// If not then proceed to copy the database from the application to the users filesystem

	// Get the path to the database in the application package
	NSString *databasePathFromApp = [[[NSBundle mainBundle] resourcePath] stringByAppendingPathComponent:databaseName];

	// Copy the database from the package to the users filesystem
	[fileManager copyItemAtPath:databasePathFromApp toPath:databasePath error:nil];

	[fileManager release];
}

-(void) readAnimalsFromDatabase {
	// Setup the database object
	sqlite3 *database;

	// Init the animals Array
	animals = [[NSMutableArray alloc] init];

	// Open the database from the users filessytem
	if(sqlite3_open([databasePath UTF8String], &database) == SQLITE_OK) {
		// Setup the SQL Statement and compile it for faster access
		const char *sqlStatement = "select * from animals";
		sqlite3_stmt *compiledStatement;
		if(sqlite3_prepare_v2(database, sqlStatement, -1, &compiledStatement, NULL) == SQLITE_OK) {
			// Loop through the results and add them to the feeds array
			while(sqlite3_step(compiledStatement) == SQLITE_ROW) {
				// Read the data from the result row
				NSString *aName = [NSString stringWithUTF8String:(char *)sqlite3_column_text(compiledStatement, 1)];
				NSString *aDescription = [NSString stringWithUTF8String:(char *)sqlite3_column_text(compiledStatement, 2)];
				NSString *aImageUrl = [NSString stringWithUTF8String:(char *)sqlite3_column_text(compiledStatement, 3)];

				// Create a new animal object with the data from the database
				Animal *animal = [[Animal alloc] initWithName:aName description:aDescription url:aImageUrl];

				// Add the animal object to the animals Array
				[animals addObject:animal];

				[animal release];
			}
		}
		// Release the compiled statement from memory
		sqlite3_finalize(compiledStatement);

	}
	sqlite3_close(database);

}

@end
Now I know that may look like a fair bit of code and it probably also looks quite scary! But really it is quite simple and I have tried to comment nearly every line to describe to you what the line does and why it is there.
The checkAndCreateDatabase function checks to see if we have already copied our database from the application bundle to the users filesystem (in their documents folder), if the database hasn’t already been created or it has been removed for some reason it will be recreated from the default database.
Next the readAnimalsFromDatabase function will make a connection to the database that is stored in the users documents folder, and then executes the SQL statement “SELECT * FROM animals”. It will then go through each row that is returned and it will extract the name, description and imageURL from the result and build an Animal object for each. You will see the “sqlite3_column_text” function used here, there are many more of these for returning other field types such as “sqlite3_column_int” for integers, “sqlite3_column_blob” for blobs or “sqlite3_column_value” to get an unknown value.
Now that we have the data in our array and we have it in our known format we are ready to start displaying it.
Open up the “RootViewController.m” file and edit the numberOfRowsInSection to look like the following:
SQLiteTutorialAppDelegate *appDelegate = (SQLiteTutorialAppDelegate *)[[UIApplication sharedApplication] delegate];
return appDelegate.animals.count;
What this does is it creates a link to the application delegate, and then the second line returns the size f the animals array in out Application delegate, this array was filled previously from the SQLite database.
Now in the cellForRowAtIndexPath function you will need at change it to look like the following:
- (UITableViewCell *)tableView:(UITableView *)tableView cellForRowAtIndexPath:(NSIndexPath *)indexPath {

    static NSString *CellIdentifier = @"Cell";

    UITableViewCell *cell = [tableView dequeueReusableCellWithIdentifier:CellIdentifier];
    if (cell == nil) {
        cell = [[[UITableViewCell alloc] initWithFrame:CGRectZero reuseIdentifier:CellIdentifier] autorelease];
    }

    // Set up the cell
    SQLiteTutorialAppDelegate *appDelegate = (SQLiteTutorialAppDelegate *)[[UIApplication sharedApplication] delegate];
	Animal *animal = (Animal *)[appDelegate.animals objectAtIndex:indexPath.row];

	[cell setText:animal.name];
	return cell;
}
We pretty much just added 3 lines under the “// Set up the cell” line, the first one is the same as we added previously to access the application delegate. The second line creates a new Animal object based on the array from the application delegate, it will be used to create a row for each individual record in the database. On the final line we are just setting the text of the cell to the name field from the Animal object.
You can now run the program and you should see a table view with the 4 animals we added to the database, if you added more than my default animals you should see them in here as well.
We will now setup the AnimalViewController, open up the “AnimalViewController.h” file and edit its contents to below:
#import <UIKit/UIKit.h>

@interface AnimalViewController : UIViewController {
	IBOutlet UITextView *animalDesciption;
	IBOutlet UIImageView *animalImage;
}

@property (nonatomic, retain) IBOutlet UITextView *animalDesciption;
@property (nonatomic, retain) IBOutlet UIImageView *animalImage;

@end
What we are doing above is adding an outlet for the description and image for the Animal, we will use these later on when we link the view up.
Now open up the “AnimalViewController.m” file and add a synthesize call for for the description and image, this will go under the “@implementation AnimalViewController” line, like so:
#import "AnimalViewController.h"

@implementation AnimalViewController

@synthesize animalDesciption, animalImage;
Now it is time to make the detailed view page appear when you select a record. Open up the “AnimalViewController.xib” file from the resources folder and the interface builder should appear.
The first thing we need to do is to set the File’s Owner Class to AnimalViewController, this is done by selecting the “File’s Owner” item in the main window and then clicking Tools > Identity Inspector in the top menu, and then selecting AnimalViewController from the class dropdown.
Your inspector window should now look like this:

We are going to be using a UITextView for the description (as it will allow for word wrapping and scrolling in the case that the description is quite large) and a UIImageView to display the image. I have laid mine out like below:

Now that we have everything laid out it is time to link them all up, start by holding control and click+drag from the “File’s Owner” to the “View” objects, a little gray menu will appear and you will need to select view. Now hold control and click+drag from the “File’s Owner” to the UITextView in the layout window, you should see “animalDescription” in the popup list, select it. Repeat this process for the UIImageView and you should see animalImage appear, select it also.
Now save the interface and close the interface builder.
Nearly done! All we have to do now is to setup the code for when a user presses on a record in the table view.
Open up the “RootViewController.h” file and edit its contents to below:
#import <UIKit/UIKit.h>
#import "AnimalViewController.h"

@interface RootViewController : UITableViewController {
	AnimalViewController *animalView;
}

@property(nonatomic, retain) AnimalViewController *animalView;

@end
We are creating an instance of the AnimalViewController to be used bu the RootViewController when a user presses on an item.
Now open up the “RootViewController.m” file and edit the top part of the file to look like below:
#import "RootViewController.h"
#import "SQLiteTutorialAppDelegate.h"
#import "Animal.h"

@implementation RootViewController
@synthesize animalView;
This will just synthesize the animalView that we just added.
First up lets set the default title of our view, to do this you need to uncomment the viewDidLoad function, and edit it to below:
- (void)viewDidLoad {
    [super viewDidLoad];
    // Uncomment the following line to add the Edit button to the navigation bar.
    // self.navigationItem.rightBarButtonItem = self.editButtonItem;

	self.title = @"My Zoo";
}
We also need to edit the didSelectRowAtIndexPath
function in this file, edit it to look like below:
- (void)tableView:(UITableView *)tableView didSelectRowAtIndexPath:(NSIndexPath *)indexPath {
    // Navigation logic -- create and push a new view controller
	SQLiteTutorialAppDelegate *appDelegate = (SQLiteTutorialAppDelegate *)[[UIApplication sharedApplication] delegate];
	Animal *animal = (Animal *)[appDelegate.animals objectAtIndex:indexPath.row];

	if(self.animalView == nil) {
		AnimalViewController *viewController = [[AnimalViewController alloc] initWithNibName:@"AnimalViewController" bundle:nil];
		self.animalView = viewController;
		[viewController release];
	}

	// Setup the animation
	[self.navigationController pushViewController:self.animalView animated:YES];
	// Set the title of the view to the animal's name
	self.animalView.title = [animal name];
	// Set the description field to the animals description
	[self.animalView.animalDesciption setText:[animal description]];
	// Load the animals image into a NSData boject and then assign it to the UIImageView
	NSData *imageData = [NSData dataWithContentsOfURL:[NSURL URLWithString:[animal imageURL]]];
	UIImage *animalImage = [[UIImage alloc] initWithData:imageData cache:YES];
	self.animalView.animalImage.image = animalImage;

}
What we are doing here is checking to see if the animalView object has already been created, if not then create it.
The next few lines are used to setup the animation (slide from right to left) and to set the actual data fields to those of the selected animal.
Now you should be ready to fire up the application and see it in all its glory.
You should see your windows looking like below.


Objective-C methods
Posted: May 25, 2011 Filed under: iPhone | Tags: object C Leave a commentObjective-C methods are designed to be self documenting, and they borrow from the rich tradition of Smalltalk.
I’ll try to explain use this sample below:
- (NSInteger) pickerView:(UIPickerView *)pickerView
 numberOfRowsInComponent:(NSInteger)component
- (NSInteger)
This first portion indicates that this is an Objective C instance method that returns a NSInteger object. the-(dash) indicates that this is an instance method, where a+would indicate that this is a class method. The first value in parenthesis is the return value of the method.pickerView:
This portion is a part of the message name. The full message name in this case ispickerView:numberOfRowsInComponent:. The Objective-C runtime takes this method information and sends it to the indicated receiver. In pure C, this would look like
NSInteger pickerView(UIPickerView* pickerView, NSInteger component). However, since this is Objective-C, additional information is packed into the message name.(UIPickerView*)pickerView
This portion is part of the input. The input here is of typeUIPickerView*and has a local variable name of pickerView.numberOfRowsInComponent:
This portion is the second part of the message name. As you can see here, message names are split up to help indicate what information you are passing to the receiver. Thus, if I were to message an object myObject with the variables foo and bar, I would type:
[myObject pickerView:foo numberOfRowsInComponent:bar];
as opposed to C++ style:
myObject.pickerView(foo, bar);.(NSInteger)component
This is the last portion of the input. the input here is of typeNSIntegerand has a local variable name of component.
Hopefully this is helpful!
Web Browser or how to use the UIWebView (Part 3/3)
Posted: May 25, 2011 Filed under: iPhone | Tags: UIWebView, WebBrowser 1 CommentHi!
This is the third and last tutorial of this series.
I’m very sorry, that you had to wait for this tutorial so long, but I had very much trouble in school.
In this tutorial we’ll put the finishing touches on our web browser.
We have to make the following things :
– Add support for landscape mode (You’ll learn the use of springs).
– Add the zoom function.
– Add the bookmarks feature (We’ll save them in the NSUserDefaults).
If you don’t already have it, download the Explorer Project Version 2 we’ve been making in this tutorial series so far, which we’ll be using as a starting point.
Ok.
Let’s start with the most simple task.
The Zoom-Function
Go to the ExplorerViewController.m file and scroll to the viewDidLoad method.
Paste in this line :
webView.scalesPageToFit = true;
Now open the ExplorerViewController.xib and click on the view.
Make sure, that the multiple touch checkbox is checked :

Now save everything, go to Xcode and test it.
If you are in the simulator and press the alt-button, you can test the pinch zoom gesture.
Support for all Orientations
If you want to support all orientations in an app you have to make sure all the controls on your view are resized correctly.
Go to the shouldAutoRotate method in the ExplorerViewController and uncomment it.
Make sure it returns true, to support all orientations.
It should look like this :
- (BOOL)shouldAutorotateToInterfaceOrientation:(UIInterfaceOrientation)interfaceOrientation {
return true;
}
Now run the app.
If you press cmd+-> or cmd+<- (-> = right arrow | <- = left arrow) you can rotate the iPhone by 90 degrees.
Test it – you’ll see, that the controls are not resized correctly and we have to work it out so that they are resized correctly.
Wrong resizing of the view :

To solve this problem we have to open the ExplorerViewController.xib file and go to the Size Inspector :


To the right you can see something, that is called “Springs and Struts”.
These springs and struts are responsible for autosizing the view.
Let’s set them to get the right resizing of our view.
Click on the webView and set the springs and struts to this state :
 We tell it to keep the relative position to all edges and to resize the height and the width of the webView.
Then click on the urlField and set the springs and struts to this state :
 Here we tell the urlField to keep the relative position to the top, the left and the right edge. We also tell it to resize the width of it, but not the height.
Now save everything and go back to Xcode.
Run your project and rotate your iPhone.
The autosizing should be fine now, like in this picture :

Adding Bookmarks To The List And Saving Them
Now we can go and tackle the last big function, that has been planned for this tutorial series – the bookmarks list.
First you have to make a small change to the user interface.
Open the ExplorerViewController.xib file and add an UIBarButtonItem left to the bookmarks-button and set the identifier to “Add”.
Then we have to make an IBAction for this new button.
Go to the ExplorerViewController.h file and declare this method :
-(IBAction)addBookmarkButtonTapped;
Then go to the ExplorerViewController.m file and paste in this code :
-(IBAction)addBookmarkButtonTapped {
UIActionSheet *actionSheet = [[UIActionSheet alloc] initWithTitle:[[[[self webView]request] URL] absoluteString] delegate:self cancelButtonTitle:@"Cancel" destructiveButtonTitle:nil otherButtonTitles:@"Add", nil];
[actionSheet showInView:self.view];
[actionSheet release];
}
If the user taps the addBookmarksButton an UIActionSheet shall appear with the options “Add” and “Cancel”.
Now we have to implement the UIActionSheetDelegate.
Go to the ExplorerViewController.h file and put “UIActionSheetDelegate”, without the “”, besides the other delegates.
Now go back to the .m file and paste in this code :
-(void)actionSheet:(UIActionSheet *)actionSheet clickedButtonAtIndex:(NSInteger)buttonIndex {
if (buttonIndex == 0) {
NSMutableArray *bookmarks = [[[NSUserDefaults standardUserDefaults] arrayForKey:@"Bookmarks"] mutableCopy];
if (!bookmarks) {
bookmarks = [[NSMutableArray alloc] init];
}
[bookmarks addObject:[[[[self webView]request] URL] absoluteString]];
[[NSUserDefaults standardUserDefaults] setObject:bookmarks forKey:@"Bookmarks"];
[bookmarks release];
}
}
As I said at the top of this tutorial, I wanted to save the bookmarks in an array and persist the array in the NSUserDefaults.
Here is what we do in this method :
1. If the buttonIndex is 0, means : if it is the “Add”-button, then we want the following code to be executed.
2. We read the array with the bookmarks from the standardUserDefaults and store it in a mutable array. It is important, that we make a mutable copy of this array, because everything we read from the NSUserDefaults is immutable.
3. We check to see if the bookmarks array is nil. If yes we create a new array.
4. We add the url of our current website to the bookmarks array.
5. We save the bookmarks array in the NSUserDefaults.
6. We release the memory used for the bookmarks array.
Showing The Bookmarks List in an UITableView
The next thing we have to do is a new view, that will show the bookmarks in an UITableView.
Right-Click on the group “Classes” and add a new file.
Choose the UIViewController file and name it “BookmarksViewController”.
Now open the BookmarksViewController.xib file and design the user interface like this :

You need a UITableView and a UIToolbar with a UIBarButtonItem and a flexible space.
Now go to the BookmarksViewController.h file and replace the content of it with this :
#import <UIKit/UIKit.h>

@class ExplorerViewController;
@interface BookmarksViewController : UIViewController <UITableViewDelegate, UITableViewDataSource>{
NSMutableArray *bookmarks;
ExplorerViewController *explorerView;
}

@property (nonatomic, retain) NSMutableArray *bookmarks;
@property (nonatomic, retain) ExplorerViewController *explorerView;

-(IBAction)cancelButtonTapped;

@end
What we do here is :
We declare a mutableArray for the bookmarks – it has to be mutable, because we want the delete function to work.
We also declare a reference to an ExplorerViewController. We need this, because we need to have access to our UIWebView on the ExplorerViewController.
If you don’t know what the @class ExplorerViewController means :
This is a forward declaration. If you want to use a class in the header file (.h file), that has to be imported, you shouldn’t import it in the header file, but you should do it in the implementation file (.m file). The @class statement tells the compiler, that the File for this class will be imported in the implementation file.
We also need an action for our cancelButton;
In the BookmarksViewController we want to make use of the UITableViewDelegate and the UITableViewDataSource.
Now go to the BookMarksViewController.m file and import the ExplorerViewController :
#import "ExplorerViewController.h"
Then synthesize the properties :
@synthesize bookmarks, explorerView;
Now let’s implement the action for the cancelButton :
-(IBAction)cancelButtonTapped {
[self.parentViewController dismissModalViewControllerAnimated:true];
}
Because we will show the BookmarksViewController as a modal ViewController we need to make use of the dismissModalViewController method to dismiss it.
Now let’s implement the UITableViewDataSource :
-(NSInteger)numberOfSectionsInTableView:(UITableView *)tableView {
return 1;
}

-(NSInteger)tableView:(UITableView *)tableView numberOfRowsInSection:(NSInteger)section {
return [bookmarks count];
}

- (UITableViewCell *)tableView:(UITableView *)tableView cellForRowAtIndexPath:(NSIndexPath *)indexPath {
static NSString *cellIdentifier = @"Cell";

UITableViewCell *cell = [tableView dequeueReusableCellWithIdentifier:cellIdentifier];
if (cell == nil) {
cell = [[[UITableViewCell alloc] initWithFrame:CGRectZero reuseIdentifier:cellIdentifier] autorelease];
}

cell.textLabel.text = [bookmarks objectAtIndex:indexPath.row];

return cell;
}
The first method requests the number of sections in this tableView – we return 1, because we want to have only one section.
The next method wants to know how many rows in the sections are – we pass back the number of bookmarks in the array.
The last method in this codeblock is a standard method for setting up tableViewCells. In a future tutorial about TableViews I will explain this method in detail, but for now you only should know, that we set the text of every cell to the link of each bookmark.
If the user taps on a row in the tableView the view should disappear and the UIWebView should load the link he tapped.
To respond on clicks on row in a tableView, we need to implement the UITableViewDelegate :
-(void)tableView:(UITableView *)tableView didSelectRowAtIndexPath:(NSIndexPath *)indexPath {
explorerView.urlField.text = [bookmarks objectAtIndex:indexPath.row];
[explorerView textFieldShouldReturn:explorerView.urlField];
[self.parentViewController dismissModalViewControllerAnimated:true];
}
In this method we set the text of the urlField in our explorerView to the link, that has been tapped and then we simulate a return click on the keyboard to make the webView load the link.
At the end of this method we dismiss this view.
Now go to the dealloc method and paste in this code :
// e.g. self.myOutlet = nil;
[explorerView release];
explorerView = nil;
[bookmarks release];
bookmarks = nil;
Now scroll to the viewDidLoad method and paste in this code :
bookmarks = [[[NSUserDefaults standardUserDefaults] arrayForKey:@"Bookmarks"] mutableCopy];
In this line we load the bookmarks from the NSUserDefaults into the bookmarks array.
Now go to the Interface Builder and connect the action of the cancelButton with the selector of the cancelButton and the delegate and dataSource of the tableView with the File’s Owner.
Save everything in the Interface Builder and go back to ExplorerViewController.h file.
Declare this method in it :
-(IBAction)bookmarksButtonTapped;
Then go to the ExplorerViewController.m file and import the BookMarksViewController :
#import "BookmarksViewController.h"
Now let’s implement the action we’ve just declared :
-(IBAction)bookmarksButtonTapped  {
BookmarksViewController *tempView = [[BookmarksViewController alloc] initWithNibName:@"BookmarksViewController" bundle:nil];
tempView.explorerView = self;
[self presentModalViewController:tempView animated:true];
[tempView release];
}
In this method we create a new BookMarksViewController and set the explorerView to the ExplorerViewController itself.
Then we show it as a modal ViewController and release it to save memory.
Now save everything and test it.
Deleting Bookmarks
Our internet browser has now a fully functional bookmarks feature……………………………………………………………..almost fully functional.
There’s one important function left in the bookmarksViewController – the delete function.
Go to the BookMarksViewController.m file and paste in this code :
-(void)tableView:(UITableView *)tableView commitEditingStyle:(UITableViewCellEditingStyle)editingStyle forRowAtIndexPath:(NSIndexPath *)indexPath {
if (editingStyle == UITableViewCellEditingStyleDelete) {
[bookmarks removeObjectAtIndex:indexPath.row];
[tableView deleteRowsAtIndexPaths:[NSArray arrayWithObjects:indexPath, nil] withRowAnimation:UITableViewRowAnimationFade];
[[NSUserDefaults standardUserDefaults] setObject:bookmarks forKey:@"Bookmarks"];
}
}
This method is also part of the UITableViewDelegate.
I will explain this method in a future tutorial about UITableViews.
For now you should know :
If you swipe from right to left and delete the tableViewCell the bookmark will be removed and the cell too.
After that we save the new bookmarks array in the NSUserDefaults.
Save everything and test it.
Finishing Touches
Now there are only some finishing touches left to do.
Open the ExplorerViewController.xib file and click on the ActivityIndicatorView.
Make sure you check the checkbox Hide when stopped.
Then click on the urlField and set the clear button attribute to “Is always visible”.
Save everything.
Tutorial Ending
Congratulations !!!
The browser is complete.
Everything is working now.
The landscape and portrait support.
The bookmarks feature.
The zoom function.
Everything!
I hope you’ve enjoyed this tutorial series.
If you’ve liked or if you found an error or if you have a question please comment. I’m glad to hear your thoughts about this series.
If you want to, I can make a tutorial of how to add the tab feature to our browser.
Here is the complete Xcode project with all the code we’ve developed in this tutorial series : Explorer Project Final Version
Happy programming and god bless.
(Source: http://kaiengelhardt.com/2011/03/13/iphone-tutorial-33-web-browser-or-how-to-use-the-uiwebview/)
Web Browser or how to use the UIWebView (Part 2/3)
Posted: May 25, 2011 Filed under: iPhone | Tags: UIWebView, WebBrowser Leave a commentHi!
This is the second tutorial of this series and we’ll add some functionality to our web browser, such as the back and forward function or the refresh function.
We’ll also add the autocorrection of URLs.
If you don’t already have it, download the Explorer Project we’ve been making in this tutorial series so far, which we’ll be using as a starting point.
Ok, let’s start!
If you didn’t open your project yet, open it!
Go Forward, Go Back and Refresh!
Go to the ExplorerViewController.h file and paste in this code under the properties :
-(IBAction)refreshWebView;
-(IBAction)goBack;
-(IBAction)goForward;
-(void)actualizeButtons;
Now we have to implement the methods we’ve just declared.
Go to the ExplorerViewController.m file and paste in this method :
-(void)actualizeButtons {
backButton.enabled = [webView canGoBack];
forwardButton.enabled = [webView canGoForward];
}
In these lines we are actualizing our controls.
The backButton should be disabled, if the webView can’t go back and the forwardButton too if the webView can’t go forward.
Now paste in these methods :
-(IBAction)refreshWebView {
if (refreshButton.style == UIBarButtonSystemItemStop) {
[webView stopLoading];
}else {
[webView reload];
}
}

-(IBAction)goBack {
[webView goBack];
[self actualizeButtons];
}

-(IBAction)goForward{
[webView goForward];
[self actualizeButtons];
}
Pretty straightforward, huh?
Now go to the Interface Builder and connect the selector of the goBackButton, the goForwardButton and the refreshButton with their corresponding actions in the File’s Owner.
Save everything in the Interface Builder, go back to Xcode and run your project.
The back and forward buttons should work and the refreshButton should refresh the web page.
Implementing the UIWebViewDelegate
The next step to improve our web-browser will be to implement the UIWebViewDelegate.
This delegate notifies us, when the webView starts loading a page, the loading of a page has been finished or an error occurred, while loading a page.
1. Go to the ExplorerViewController.h file and add this :
UIWebViewDelegate
right next to the UITextFieldDelegate inside the <> braces.
Here is how it should look like :

The UIWebViewDelegate has got 3 important methods :
- (void)webView:(UIWebView *)webView didFailLoadWithError:(NSError *)error;
- (void)webViewDidFinishLoad:(UIWebView *)webView;
- (void)webViewDidStartLoad:(UIWebView *)webView;
Let’s implement them :
- (void)webView:(UIWebView *)webView didFailLoadWithError:(NSError *)error {
[loadingActivity stopAnimating];
[refreshButton release];
refreshButton = nil;
refreshButton = [[UIBarButtonItem alloc] initWithBarButtonSystemItem:UIBarButtonSystemItemRefresh target:self action:@selector(refreshWebView)];
navigationBar.topItem.rightBarButtonItem = refreshButton;
}

- (void)webViewDidFinishLoad:(UIWebView *)webView {
[loadingActivity stopAnimating];
[refreshButton release];
refreshButton = nil;
refreshButton = [[UIBarButtonItem alloc] initWithBarButtonSystemItem:UIBarButtonSystemItemRefresh target:self action:@selector(refreshWebView)];
navigationBar.topItem.rightBarButtonItem = refreshButton;
urlField.text = [[[[self webView]request] URL] absoluteString];
[self actualizeButtons];
}

- (void)webViewDidStartLoad:(UIWebView *)webView {
[loadingActivity startAnimating];
[refreshButton release];
refreshButton = nil;
refreshButton = [[UIBarButtonItem alloc] initWithBarButtonSystemItem:UIBarButtonSystemItemStop target:self action:@selector(refreshWebView)];
navigationBar.topItem.rightBarButtonItem = refreshButton;
}
As the webView starts loading a website we make the UIActivityIndicatorView start animating an change the style of the refreshButton to the UIBarButtonSystemItemStop.
As the webView stops loading or an error occurred while loading we make the UIActivityIndicatorView stop animating and change the style of the refreshButton to the UIBarButtonSystemItemRefresh.
In every step we actualize the back- and forwardButton.
Ok now switch over to the Interface Builder and connect the webView’s delegate with the File’s Owner.
Btw. you can click on the UIActivityIndicatorView and check the checkbox “Hide when stopped”.
Save your changes, go back to Xcode.
Now you can run your project and test it.
Tackling the URL Issues
Everything should work fine, but there are some minor issues we will be fixing now.
The first thing is, that if you are browsing and you are following a link to another website the text of the urlField is not actualized to the current URL.
Go to the webViewDidFinishLoad method and add this line at the bottom :
urlField.text = [[[[self webView]request] URL] absoluteString];
Now we have this and we can tackle the next thing : The http://-prefix issue
Go to the ExplorerViewController.h file and add this method declaration :
-(NSString*)repairURL:(NSString*)url;
Now go to the ExplorerViewController.m file and add the implementation of this method :
-(NSString*)repairURL:(NSString*)url{
int atemp = 0;
for(int i = 0;i<[url length];i++){
if([url characterAtIndex:i] == '.'){
atemp++;
}
}
if((atemp == 0)||([url characterAtIndex:[url length]-1]=='.')){
return url;
}
NSString *temp = @"";
if([url length] >=11)
temp  = [NSString stringWithFormat:@"%@",[url substringToIndex:11]];
NSString *temp2 = @"";
if(![temp isEqualToString:@"http://www."]){
for(int i = 0;i<[url length];i++){
if([url characterAtIndex:i] == '.'){
if(([url characterAtIndex:i-1] == 'w')||([url characterAtIndex:i-1] == 'W')){
temp2 = [url substringFromIndex:i+1];
}else{
temp2 = url;
}
break;
}
}
temp = [NSString stringWithFormat:@"%@%@",@"http://www.",temp2];
if ([[temp substringToIndex:18] isEqualToString:@"http://www.http://"]) {
temp = [temp substringFromIndex:11];
}
return temp;
}else{
return url;
}
}
Now you can go to the textFieldShouldReturn method and add the following line at the beginning :
urlField.text = [self repairURL:urlField.text];
Tutorial Ending
Now we have implemented the main features of our browser.
There is one button, that has no function until now – the bookmarks-button.
In the third and last tutorial of this series, we’ll add the feature of bookmarking websites and persisting them in the NSUserDefaults.
Here’s the sample project with all of the code we’ve implemented in this tutorial : Explorer Project Version 2
Happy programming and god bless.
(Source: http://kaiengelhardt.com/2011/02/26/iphone-tutorial-23-web-browser-or-how-to-use-the-uiwebview/)
